Control Your Computer From Your Phone with Python, FastAPI & Android
What if your phone could start your development environment, open a project, report CPU and memory usage, lock your workstation, launch a backup, or trigger any automation you intentionally define? In this tutorial we will build exactly that: a small Python service running on your computer and an Android app that controls it securely.
The interesting part is not simply making a phone send a command to a computer. That can be done in a few lines. The real engineering problem is designing the system so that it is useful without turning your computer into an unauthenticated remote shell.
1. What can you automate?
Once a trusted service is running on your own computer, a mobile app can become a programmable remote control for repetitive workflows. Examples include:
- start your local development stack;
- open VS Code, PyCharm, Android Studio or a project folder;
- launch a backup or synchronization script;
- show CPU, memory, disk and battery status;
- lock the workstation;
- open a predefined website or dashboard;
- start or stop a service you explicitly configured;
- run a media or presentation shortcut;
- trigger home-lab jobs from your phone;
- send a notification back when a long-running task finishes.
You can keep extending the same design. The mobile app does not need to understand how Linux, Windows or macOS performs an operation. It only needs to know that an action such as start_dev exists.
2. The architecture
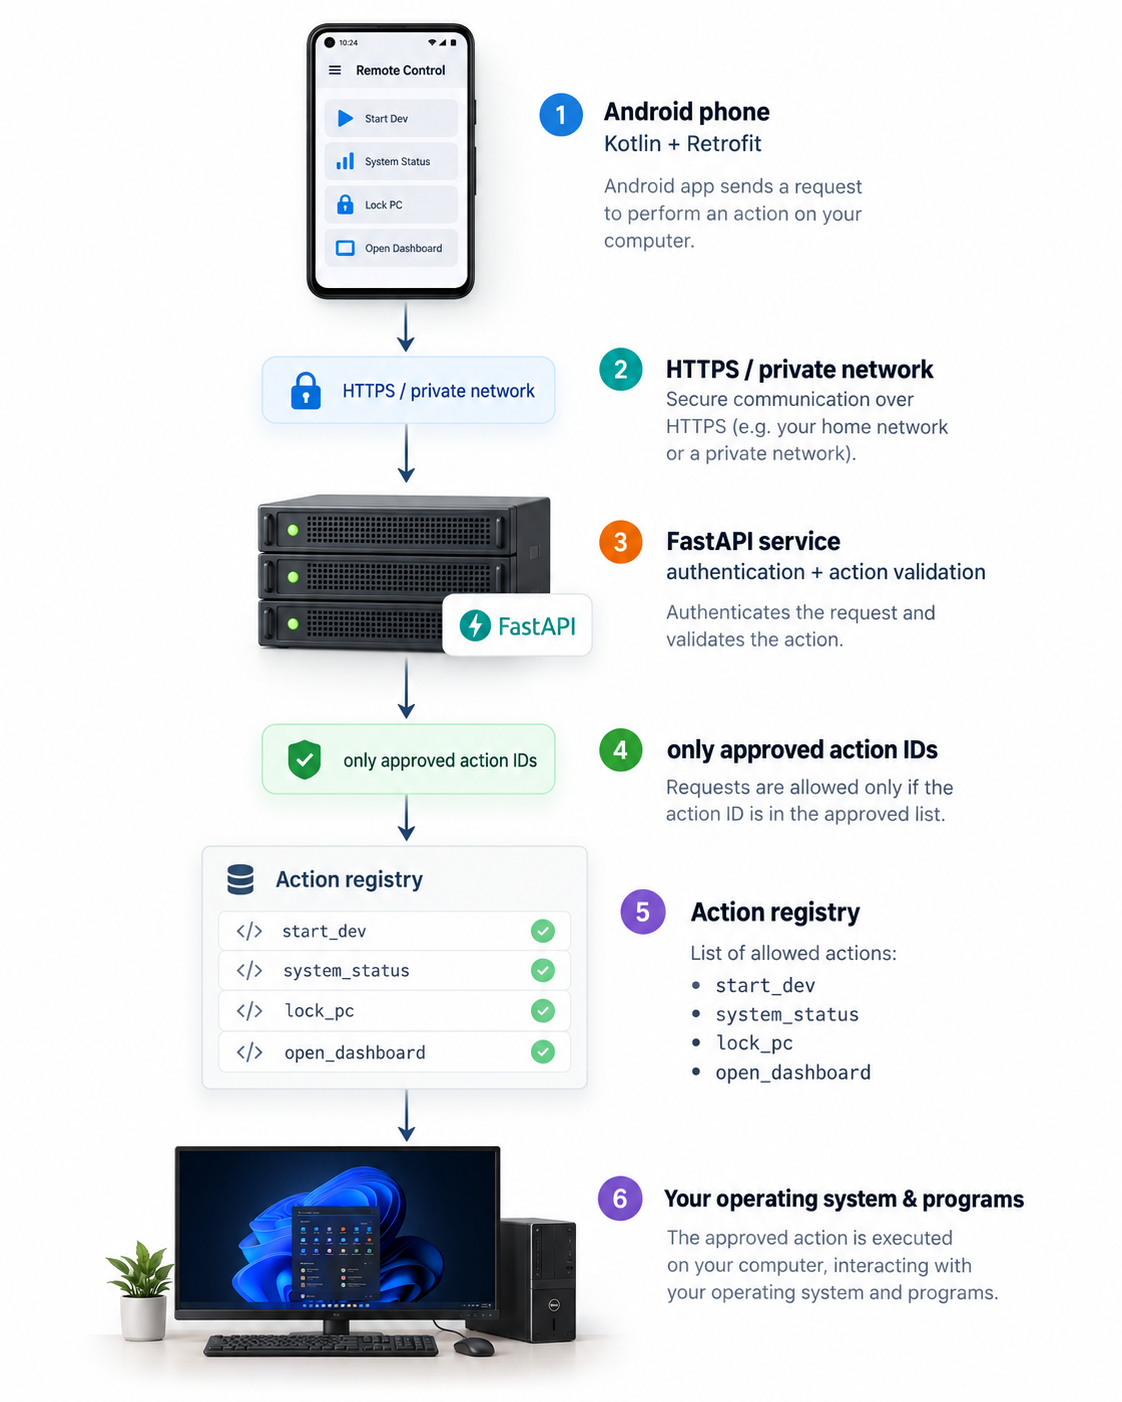
This separation is important. The API accepts a small vocabulary of actions. It does not accept arbitrary shell text from the phone.
POST /run?command=... and feed the value into a shell. If that endpoint is exposed, a stolen token, input-validation mistake or network misconfiguration can become full remote code execution. Define actions on the computer and send only action IDs from the mobile client.3. Why FastAPI?
FastAPI is a good fit for a personal automation gateway because the API surface is small, request models are easy to validate and you can add authentication, WebSockets and async jobs without changing the overall architecture. FastAPI also exposes standard security utilities for bearer tokens and OAuth2 flows.
For this tutorial we will keep authentication intentionally simple so the automation design stays visible. For a real multi-user product, move to proper user accounts, short-lived access tokens, rotation and revocation.
4. Create the desktop automation service
Create a Python environment and install the packages:
pip install fastapi uvicorn psutilNow create main.py:
import os
import platform
import subprocess
import webbrowser
from pathlib import Path

import psutil
from fastapi import Depends, FastAPI, Header, HTTPException
from pydantic import BaseModel

app = FastAPI(title="Personal Automation API")

API_TOKEN = os.environ["AUTOMATION_API_TOKEN"]


class ActionRequest(BaseModel):
    action: str


def require_token(authorization: str | None = Header(default=None)):
    expected = f"Bearer {API_TOKEN}"
    if authorization != expected:
        raise HTTPException(status_code=401, detail="Unauthorized")


def system_status():
    return {
        "hostname": platform.node(),
        "os": platform.system(),
        "cpu_percent": psutil.cpu_percent(interval=0.2),
        "memory_percent": psutil.virtual_memory().percent,
        "disk_percent": psutil.disk_usage("/").percent,
    }


def open_dashboard():
    webbrowser.open("https://github.com/TalhaJalvi")
    return {"message": "Dashboard opened"}


def start_dev():
    project = Path.home() / "projects" / "my-app"

    # A fixed executable and fixed arguments are safer than accepting shell text.
    subprocess.Popen(
        ["code", str(project)],
        shell=False,
    )

    return {"message": "Development project opened"}


def lock_pc():
    system = platform.system()

    if system == "Linux":
        subprocess.run(["loginctl", "lock-session"], check=True, shell=False)
    elif system == "Windows":
        subprocess.run(
            ["rundll32.exe", "user32.dll,LockWorkStation"],
            check=True,
            shell=False,
        )
    elif system == "Darwin":
        subprocess.run(
            [
                "/System/Library/CoreServices/Menu Extras/User.menu/Contents/Resources/CGSession",
                "-suspend",
            ],
            check=True,
            shell=False,
        )
    else:
        raise RuntimeError("Unsupported operating system")

    return {"message": "Computer locked"}


ACTIONS = {
    "system_status": system_status,
    "open_dashboard": open_dashboard,
    "start_dev": start_dev,
    "lock_pc": lock_pc,
}


@app.get("/health")
def health():
    return {"ok": True}


@app.post("/api/actions")
def run_action(request: ActionRequest, _: None = Depends(require_token)):
    handler = ACTIONS.get(request.action)

    if handler is None:
        raise HTTPException(status_code=404, detail="Unknown action")

    try:
        result = handler()
        return {"ok": True, "action": request.action, "result": result}
    except Exception as exc:
        raise HTTPException(status_code=500, detail=str(exc)) from exc
Set a long random token instead of hardcoding it:
export AUTOMATION_API_TOKEN="replace-with-a-long-random-secret"
uvicorn main:app --host 0.0.0.0 --port 8123
At this point the computer exposes a small API, but only actions registered in ACTIONS can run.
5. Test it locally
curl http://127.0.0.1:8123/healthThen trigger an approved action:
curl -X POST http://127.0.0.1:8123/api/actions \
  -H "Authorization: Bearer $AUTOMATION_API_TOKEN" \
  -H "Content-Type: application/json" \
  -d '{"action":"system_status"}'
A response may look like this:
{
  "ok": true,
  "action": "system_status",
  "result": {
    "hostname": "dev-machine",
    "os": "Linux",
    "cpu_percent": 18.2,
    "memory_percent": 61.7,
    "disk_percent": 44.3
  }
}
6. Make actions reusable instead of writing one giant API file
As your automation library grows, split actions into modules. Your API should behave more like a dispatcher than a collection of unrelated operating-system code.
automation/
├── main.py
├── auth.py
├── registry.py
└── actions/
    ├── system.py
    ├── development.py
    ├── backups.py
    └── media.py
A simple action object can also carry metadata that the mobile app can display:
from dataclasses import dataclass
from collections.abc import Callable


@dataclass
class Action:
    id: str
    title: str
    description: str
    dangerous: bool
    handler: Callable


ACTIONS = {
    "start_dev": Action(
        id="start_dev",
        title="Start development",
        description="Open the project and development tools",
        dangerous=False,
        handler=start_dev,
    ),
    "lock_pc": Action(
        id="lock_pc",
        title="Lock computer",
        description="Immediately lock the workstation",
        dangerous=True,
        handler=lock_pc,
    ),
}
You can then add GET /api/actions and let the phone render buttons dynamically rather than hardcoding every command in the Android application.
7. Connect the Android app with Retrofit
The Android side can be very small. It only needs the computer's API address, an authentication token and a list of available actions.
Define request and response models:
data class ActionRequest(
    val action: String
)

data class ActionResponse(
    val ok: Boolean,
    val action: String,
    val result: Map<String, Any?>?
)
Create the Retrofit service:
import retrofit2.http.Body
import retrofit2.http.Header
import retrofit2.http.POST

interface AutomationApi {
    @POST("api/actions")
    suspend fun runAction(
        @Header("Authorization") authorization: String,
        @Body body: ActionRequest
    ): ActionResponse
}
Then call it from a repository or ViewModel:
class AutomationRepository(
    private val api: AutomationApi,
    private val token: String
) {
    suspend fun run(action: String): ActionResponse {
        return api.runAction(
            authorization = "Bearer $token",
            body = ActionRequest(action)
        )
    }
}
A Compose screen can expose a few large buttons:
@Composable
fun AutomationScreen(
    onAction: (String) -> Unit
) {
    Column {
        Button(onClick = { onAction("system_status") }) {
            Text("System status")
        }

        Button(onClick = { onAction("start_dev") }) {
            Text("Start development")
        }

        Button(onClick = { onAction("open_dashboard") }) {
            Text("Open dashboard")
        }

        Button(onClick = { onAction("lock_pc") }) {
            Text("Lock computer")
        }
    }
}
That is already enough for a working phone-to-computer controller on the same trusted network.
8. Do not expose the FastAPI port directly to the public internet
The simplest version works over your home Wi-Fi, but many people immediately want access while away from home. Avoid solving that by forwarding port 8123 from your router to your computer.
A better personal setup is a private overlay network such as Tailscale. Install it on the computer and phone, place both devices in the same tailnet and connect to the computer through its private Tailscale address or MagicDNS name.
Tailscale's documentation describes a tailnet as a private network of authenticated users and devices. Its access-control policies can further restrict which devices are permitted to connect to a resource. For a personal automation service, that lets you avoid publishing the API to the open internet.
9. Why shell=False and fixed arguments matter
Python's subprocess module does not implicitly invoke a system shell in the normal case. That is useful here because your application can execute a known program with a known list of arguments without asking a shell to interpret user-controlled text.
Compare these two designs:
Unsafe design
# Do not expose this pattern through a remote API.
command = request.command
subprocess.run(command, shell=True)
Safer design
ACTIONS = {
    "open_project": lambda: subprocess.Popen(
        ["code", "/home/talha/projects/my-app"],
        shell=False,
    )
}
The safer version limits what the mobile client can request. The phone chooses an operation; the computer owns the implementation.
10. Add confirmation for destructive actions
Not every automation should execute after one accidental tap. Treat power-off, restart, deleting files, stopping databases and changing network settings differently from harmless shortcuts.
A good pattern is to classify actions:
| Risk | Examples | Suggested behavior |
|---|---|---|
| Low | system status, open dashboard | run immediately |
| Medium | start backup, restart a development service | show result and audit entry |
| High | lock, reboot, shutdown, destructive maintenance | require explicit confirmation and optionally recent re-authentication |
For high-risk actions, the first API call can create a short-lived confirmation challenge and the second call can execute it. This prevents accidental presses and gives you room for biometric confirmation on Android.
11. Run long jobs in the background
Some actions finish immediately, while others may take minutes. A backup, media conversion, build or data-processing job should not keep a mobile HTTP request open until completion.
A cleaner API looks like this:
POST /api/jobs
{
  "action": "backup_photos"
}

202 Accepted
{
  "job_id": "7eec...",
  "status": "queued"
}
The phone can poll GET /api/jobs/{id}, or the server can push updates over a WebSocket connection. FastAPI supports WebSocket endpoints directly, so the same backend can send progress events such as queued, running, 80% and completed.
12. Turn the phone into a live system dashboard
Once communication exists in both directions, the project becomes more interesting than a collection of remote buttons. Your app can display live machine state:
- CPU load and temperature;
- RAM and disk usage;
- battery and charging state on a laptop;
- Docker/container status;
- whether a local API or database is running;
- current backup status;
- Git branch or build state for a development machine.
For near-real-time values, send compact updates over WebSockets rather than repeatedly creating HTTP requests every second.
13. Example: a one-tap “Start Work” automation
Suppose every morning you perform the same sequence: open your code project, start Docker services, open your task board and launch Slack. Instead of putting four powerful commands in the mobile app, expose one intent: start_work.
def start_work():
    project = Path.home() / "projects" / "my-app"

    subprocess.Popen(["code", str(project)], shell=False)
    subprocess.Popen(
        ["docker", "compose", "up", "-d"],
        cwd=project,
        shell=False,
    )
    webbrowser.open("https://github.com/pulls")

    return {
        "message": "Work environment started",
        "project": str(project),
    }


ACTIONS["start_work"] = start_work
The phone sends:
{"action":"start_work"}The important architectural idea is that start_work represents your intent. All OS-specific details stay on your computer. Later you can change VS Code to PyCharm, Docker Compose to another service manager, or the task-board URL without publishing a new Android app.
14. Automate based on events, not only buttons
Manual control is only the first stage. The same action registry can also respond to schedules and events:
- run a backup at night if the laptop is charging;
- start a development service when you connect to your home network;
- notify the phone when a build finishes;
- stop expensive local workloads when battery falls below a threshold;
- trigger a maintenance task from a webhook;
- run a morning workflow on weekdays.
This is where the project moves from remote control to an actual automation platform. Keep the trigger layer separate from the action layer: a button, schedule or webhook should all be able to trigger the same vetted action.
15. A more production-ready design
If you evolve this from a personal experiment into a product, add explicit boundaries before adding more commands.
| Area | Personal prototype | Production direction |
|---|---|---|
| Authentication | single bearer secret | OAuth2/OIDC, short-lived JWTs, refresh/revocation |
| Network | trusted Wi-Fi / Tailscale | TLS, private access policy, device identity |
| Commands | hardcoded action registry | permissioned action catalog and policy checks |
| Secrets | environment variable | platform keystore/secret manager |
| Audit | console log | who triggered which action, when and result |
| Long jobs | direct function call | queue + worker + job state |
| Dangerous actions | manual caution | confirmation, step-up auth, least privilege |
16. Security checklist
- Never accept arbitrary shell commands from the mobile client.
- Keep an explicit allowlist of action identifiers.
- Run the automation service as a normal user, not as root or Administrator.
- Use
shell=Falsewith fixed executable names and arguments wherever possible. - Require authentication even on a private network.
- Prefer a private device network instead of public router port forwarding.
- Store secrets outside source code and never commit them to Git.
- Log action ID, device/user, timestamp, result and failure.
- Require confirmation for destructive operations.
- Rate-limit repeated requests and reject unknown actions.
- Keep operating systems, Python packages and networking software updated.
- If multiple users exist, authorize each action separately rather than treating authentication as permission to do everything.
17. Ideas to extend the project
Once the safe foundation is working, you can turn this into a substantial portfolio project:
- Dynamic action discovery: the app downloads available actions and renders the UI.
- WebSocket telemetry: live CPU, memory, services and job progress.
- Android widgets: trigger favorite actions from the home screen.
- Notifications: tell the phone when a backup, build or download finishes.
- Biometric confirmation: require fingerprint/face confirmation for high-risk actions.
- Multiple computers: laptop, desktop, Raspberry Pi and home server under one app.
- Schedules: define morning, shutdown and maintenance routines.
- Plugin architecture: install action modules without changing the API core.
- Voice or AI interface: translate natural-language requests into known action IDs, while still keeping the action allowlist as the final security boundary.
start_work; the desktop service should still validate that start_work exists and is allowed.18. Final architecture
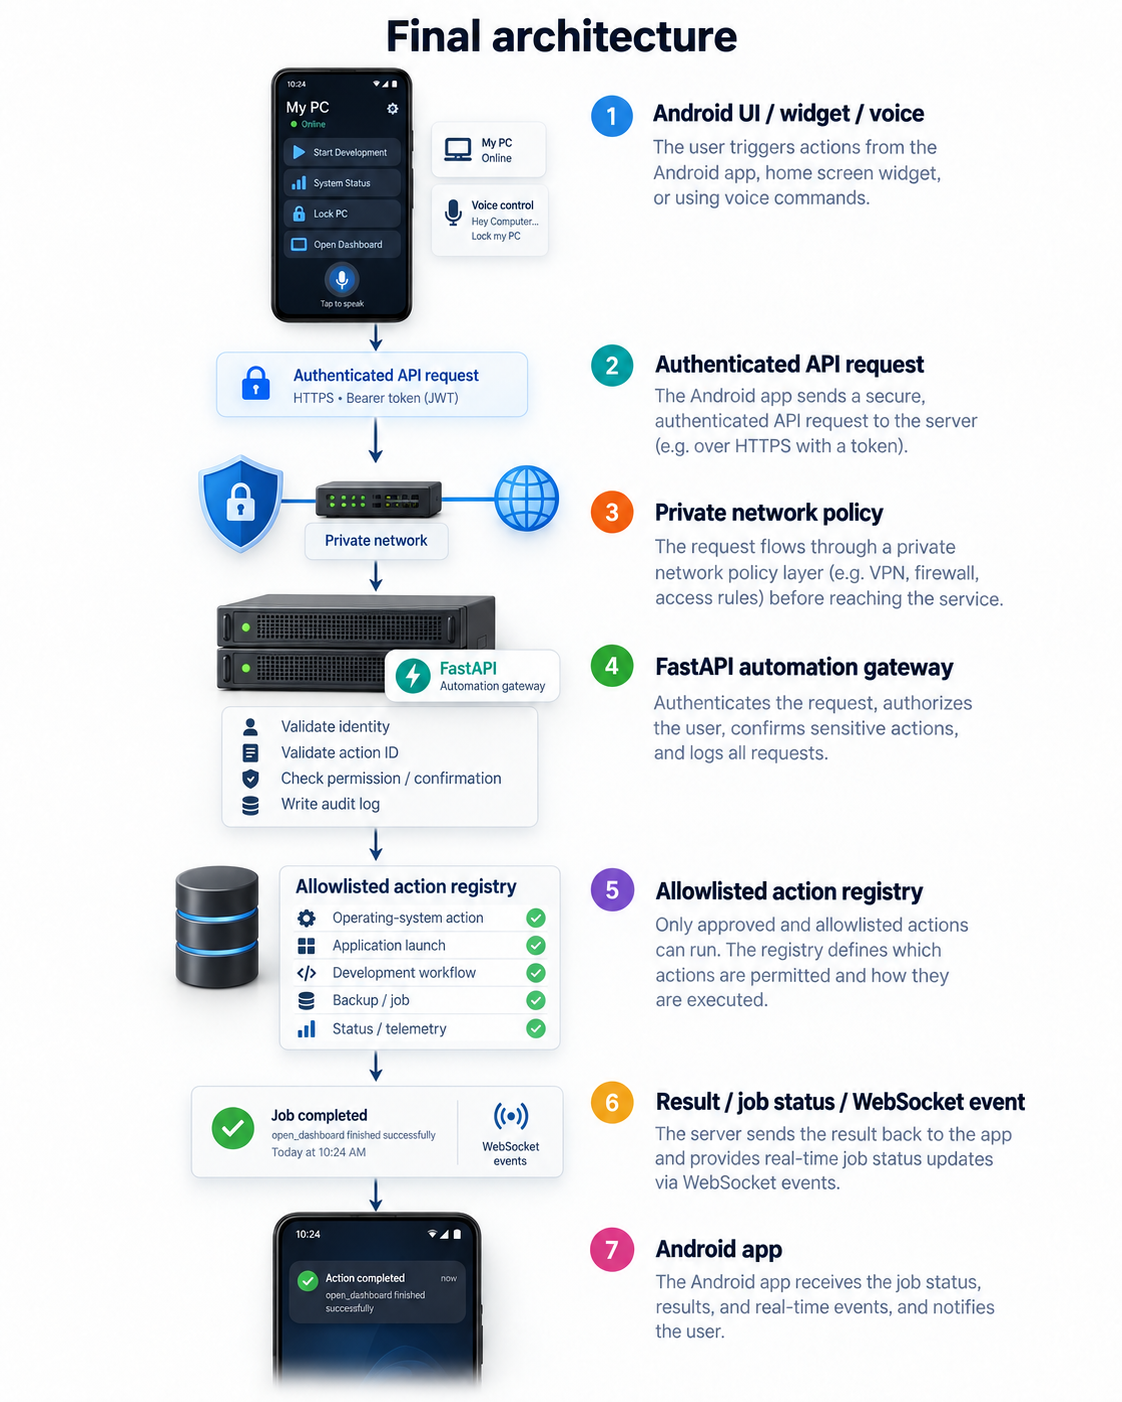
The project can start as a weekend utility and grow into a serious demonstration of mobile development, Python backend engineering, operating-system automation, networking, authentication, asynchronous jobs and security design.
Sources and further reading
I recommend reviewing the primary documentation below before adapting the example to your own machine:
- FastAPI security documentation
- FastAPI OAuth2 with bearer JWT tokens
- FastAPI WebSockets documentation
- Python subprocess security considerations
- Retrofit documentation for Android HTTP APIs
- Tailscale: what is a tailnet?
- Tailscale access management
- Tailscale security best practices
- Google: creating helpful, reliable, people-first content
- Google Article structured data documentation
Where to go next
If you want to take this beyond a prototype, the next useful step is building an action-discovery endpoint, Android dashboard, WebSocket telemetry and per-action permissions. Those four pieces turn the simple remote into a reusable personal automation platform.